
Queen Breeding and Genetics and Why I Began Breeding My Own Queen bees
I first started breeding queens after the Varroa mite reached Australia and strict biosecurity rules were put in place. Suddenly, beekeepers couldn’t transport queens across state borders, and it became clear that South Australians would need to become more self-sufficient. Around that time, one of my hives went queenless it weakened fast, lost population, and I eventually had to combine it with another colony just to keep the bees alive.That moment hit hard. It showed me how completely dependent every hive is on its queen and how quickly a strong colony can collapse without her. From then on, I decided I wanted to learn how to raise my own queens, not just to replace losses, but to improve the overall genetics of my bees for gentleness, productivity, and resilience.

What I learned from Other Beekeepers

Throughout my project, I interviewed a wide range of experienced beekeepers across Australia and New Zealand. Each one had a different system, but they all agreed on one thing: good queens come from good conditions and consistent management. From my interviews, I learnt that: Some breeders focus on hygienic behaviour, selecting colonies that naturally remove dead or infected brood. Others prefer temperament and productivity, believing calm, heavy-producing hives are easier to manage and less stressful for the bees. A few told me that local adaptation is just as important as genetics, and that queens raised in the same area where they’ll live always perform better. Many said that record keeping is key tracking, which colonies perform best, survive winter, and resist disease, allowing you to select the right breeder stock year after year. These interviews showed me that breeding isn’t a one-time thing; it’s a continuous process of observation, evaluation, and improvement.
Selecting My breeder Queens
When I choose my breeder queens, I look for four key traits that came up repeatedly in both my research and interviews: gentle temperament and calm bees that can be handled without smoke or stings. Strong brood pattern, compact and even laying that fills frames edge-to-edge.Honey production hives that consistently perform well across seasons.The hygienic behaviour of bees that clean cells quickly, reducing chalkbrood and other brood diseases. If a colony shows all four traits and maintains strength through late summer, I mark it as a potential breeder hive. These are the colonies that have proven themselves under Riverland conditions, hot, dry, and sometimes unpredictable climate.
Great Brood Pattern from one of my breeder colonies

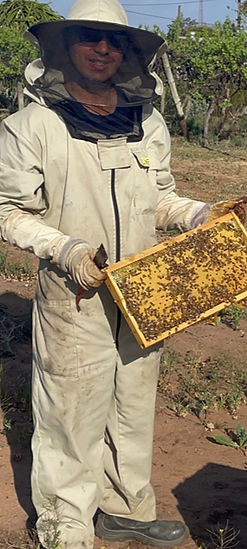
My Grafting Setup

I use a simple DIY cell-bar frame made from light timber, with removable bars that hold push-in plastic queen-cell bases (brown/yellow cup holders). The bars are spaced so I can graft comfortably while holding one in my hand, then clip it back into the frame. I work at a clean bench under a bright desk lamp for clear visibility of young larvae, keeping the frame and cups close so grafts don’t dry out. This no-frills setup is sturdy, cheap to build, and easy to load with cups before moving the finished bar straight to the starter colony.
Grafting Procces
Grafting is one of the hardest but most rewarding parts of the process. I only graft larvae under 24 hours old, the same length as a freshly laid egg. Using a grafting tool, store-bought or just a carved matchstick, I carefully lift each larva with a thin film of royal jelly and transfer it into a wax or plastic queen cup. Through interviews, I’ve learnt that: Good lighting and magnification are critical. Grafting is best done mid-morning, when bees are calm and the humidity is stable. Each graft must stay moist. I keep a damp towel over the frame to prevent dehydration. The fewer cells grafted, the better the results. Around 20 per starter hive is ideal. One beekeeper explained that grafting isn’t about speed, it’s about touch. The steadier and slower you go, the higher your acceptance rate. That advice helped me reach nearly 90% success on my recent grafts.
Care and Management of Queen Cells
After grafting, I place the frame into a queenless starter hive full of young nurse bees. They immediately start feeding the grafted larvae with royal jelly. After 24 hours, I check for accepted grafts, these are the cups where larvae are floating in a milky pool of royal jelly. Accepted cells are then moved into a cell builder colony, which keeps them at the correct temperature and humidity until they’re sealed. I learnt that bee density and feed availability are crucial; colonies with too few bees or not enough pollen won’t raise healthy queens. Once the cells are capped, I note the graft date and the expected emergence date (around day 16). I always double-check the capped cells, and those that look uneven or small are removed. Accepted cells are then moved into a cell builder hive, which keeps the temperature and humidity stable while the queens continue to develop. The stronger and better-fed the builder hive, the better the queens. On day 10, I can see the cells by holding them against a bright light to check that the developing queen is full-sized and healthy. Misshapen or darkened cells are culled. The remaining cells are carefully placed into mating nucleus hives or an incubator to finish developing.


(Adapted from Frost & Somerville, 2016, p. 30

Emergance and Mating
Around day 16, the queens emerge naturally in the nucleus hives. For the first few days, they stay inside the hive, strengthening their wings, then take short mating flights when the weather is warm and calm.I don’t disturb them during this period. After about two weeks, I open the nuc and look for signs of laying small patches of eggs in neat patterns. This confirms she’s mated successfully.

Evidence of Queen Laying
Marking New Queen
Once the new queen shows evidence of laying, I gently catch and mark her using a small paint marker on her thorax. This makes it easy to identify her later and track her age.I only mark queens that have started laying to ensure they’re strong, fertile, and accepted by their colony. Marking too early can cause the colony to reject her. By waiting until I see consistent brood patterns, I know she’s established and healthy. I record her emergence date, mating date, and colony ID. This helps track performance and select the best queens for future breeding.

